

Dirty earbuds are the leading cause of degraded audio quality in otherwise functional wireless earbuds. Earwax, sweat, and dust build up on speaker mesh and ear tips, creating an acoustic barrier that muffles sound and reduces clarity. To clean earbuds and maintain audio performance, you need three core tools: a soft-bristled brush, a microfiber cloth, and isopropyl alcohol at 70% concentration or less. Skipping regular maintenance does not just affect hygiene. It physically blocks sound from reaching your ears at full fidelity, and aggressive cleaning attempts can make the damage permanent.
What tools do you need to clean earbuds safely?
The right tools make the difference between restoring your earbuds and wrecking them. Audio professionals consistently recommend a short list of supplies that clean effectively without risking damage to delicate drivers or mesh.
Essential cleaning supplies:
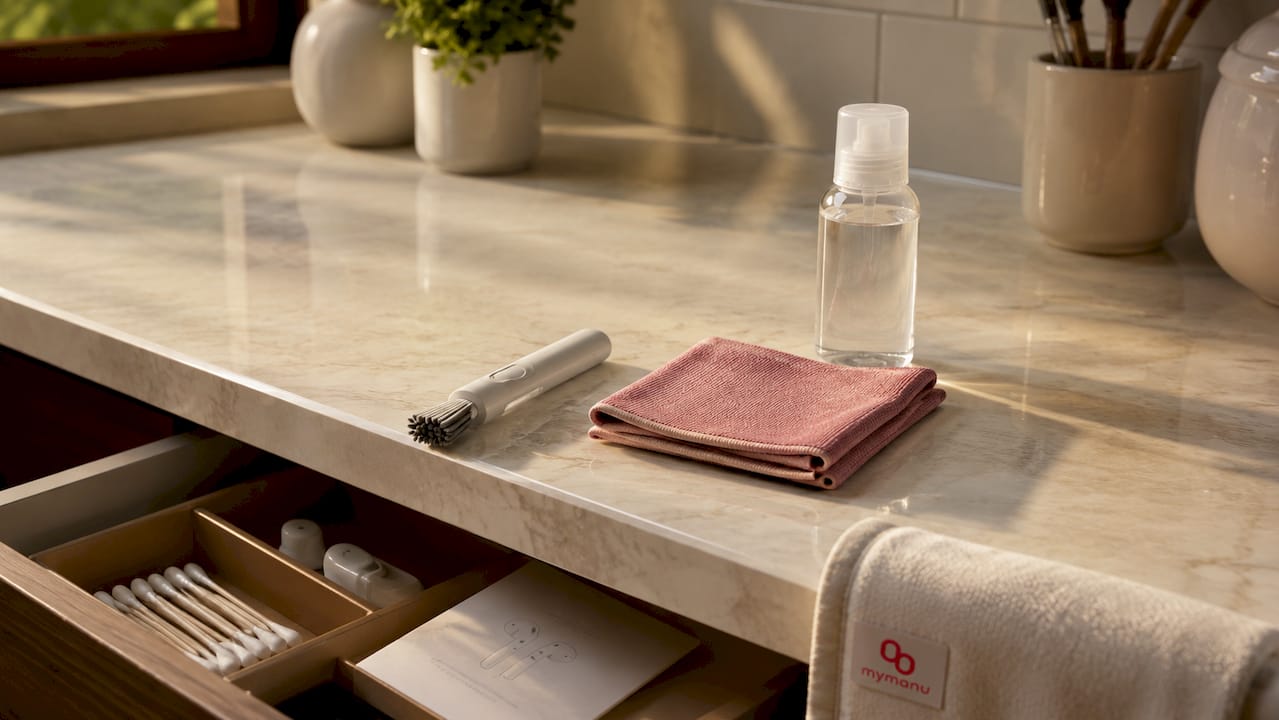
- Soft-bristled brush: A clean, dry toothbrush or a dedicated electronics brush works well for sweeping debris off speaker mesh. Never use a metal brush or stiff bristles.
- Microfiber cloth: Use this for wiping down the outer casing. A lightly dampened cloth handles fingerprints and surface grime without leaving lint.
- Isopropyl alcohol (70% or less): Apply alcohol to a cloth, never directly onto the earbud. It evaporates quickly and leaves no residue.
- Adhesive putty: Products like Blu-Tack lift debris from mesh without pushing it deeper. This is one of the most underused tools in earbud care.
- Mild soap and water: Reserved for silicone or foam ear tips only, never for the earbud body itself.
What to avoid:
| Item | Why It’s Harmful |
|---|---|
| Cotton swabs on mesh | Push wax deeper and leave fibers behind |
| Sharp objects or pins | Puncture or tear delicate speaker mesh |
| Spray bottles near earbuds | Introduce excess moisture to electronics |
| Paper towels | Scratch casings and leave debris |
Pro Tip: Keep a small cleaning kit in your earbud case. A travel-size brush and a folded microfiber cloth take up almost no space and make weekly cleaning a two-minute habit.
How to clean earbuds step by step without causing damage
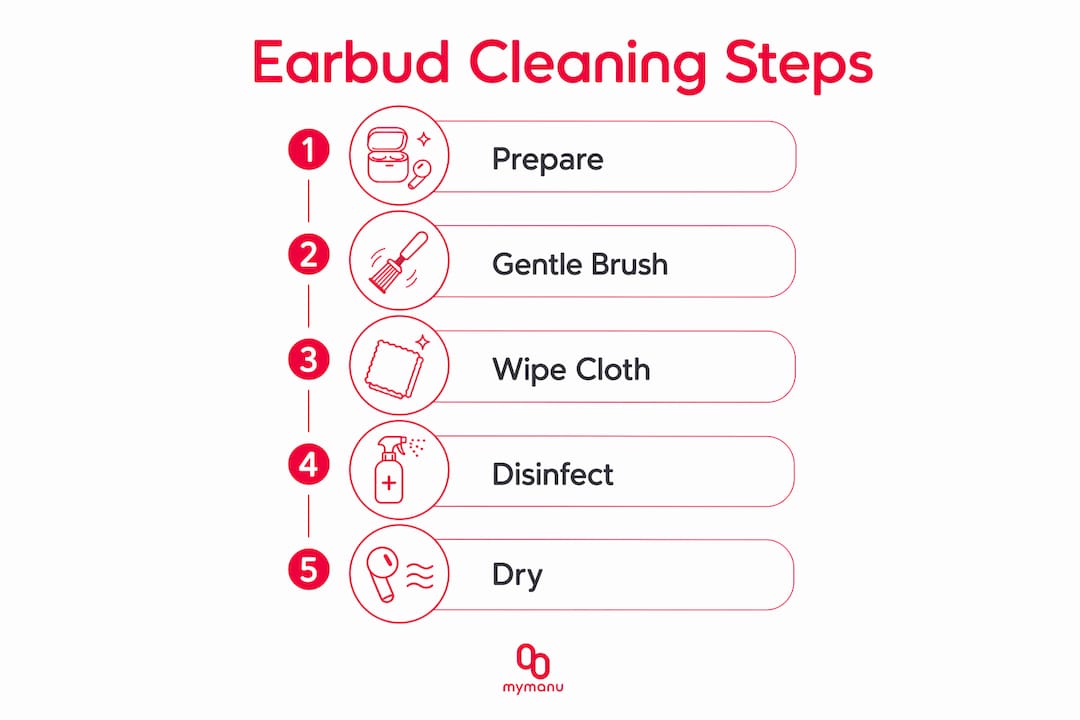
Follow this sequence every time you clean. The order matters because each step builds on the last, and skipping steps leads to redepositing debris you just loosened.
-
Remove the ear tips first. Pull silicone or foam ear tips off the earbud nozzle. These collect the most earwax and need separate attention. Ear tips require washing with mild soap and warm water. Rinse thoroughly, then set them aside to dry completely before reattaching.
-
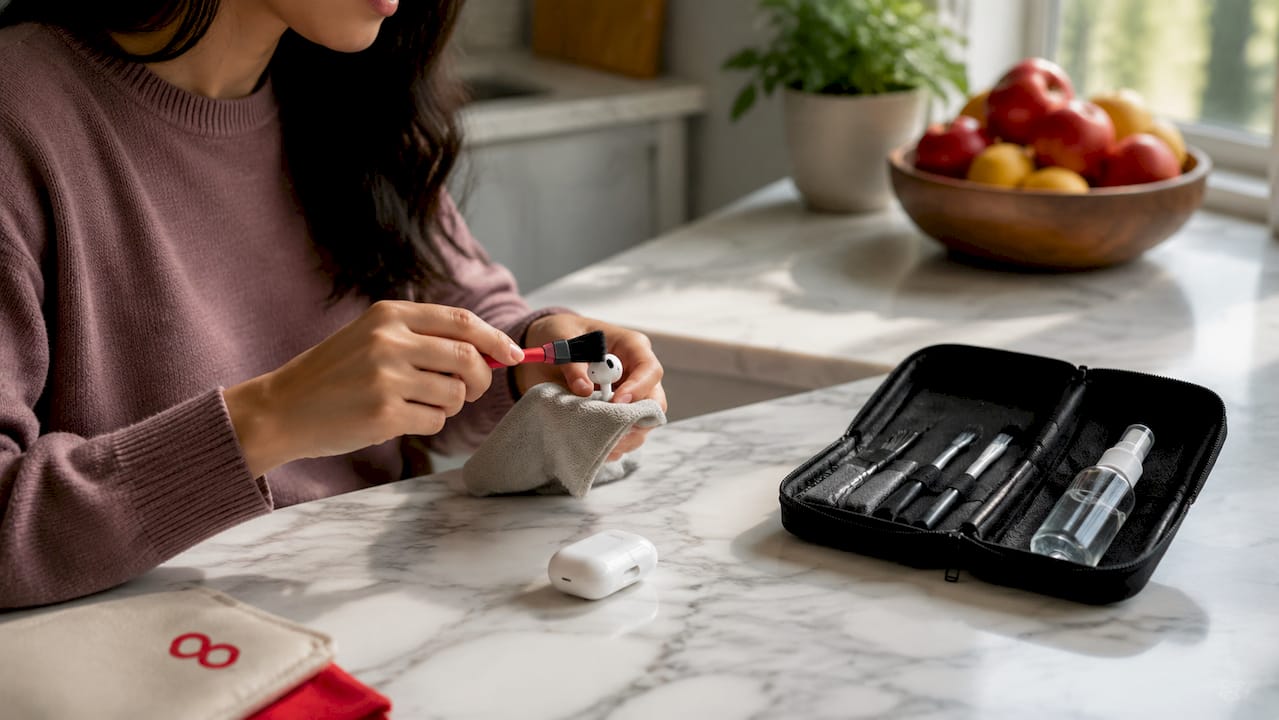
Orient the earbud correctly. Hold the speaker mesh facing downward throughout the brushing step. Gravity pulls loosened debris away from the mesh instead of letting it settle back in. This single technique dramatically improves cleaning results.
-
Brush the mesh gently. Use your soft-bristled brush in short, outward strokes. Work from the center of the mesh toward the edges. Do not press hard. The goal is to dislodge debris, not scrub it off.
-
Use adhesive putty for stubborn buildup. Press a small piece of Blu-Tack lightly against the mesh and lift straight off. Repeat two or three times. This pulls out particles that brushing alone cannot reach.
-
Wipe the casing with a microfiber cloth. A dry cloth handles most surface grime. For tougher residue, dampen the cloth lightly with isopropyl alcohol and wipe in one direction. Never rub in circles, which can push grime into seams.
-
Clean the charging case and contacts. Charging contacts accumulate earwax and dust over time, which disrupts the connection and affects battery performance. Use a cloth lightly dampened with isopropyl alcohol to wipe the metal contacts inside the case. Let everything dry before placing earbuds back inside.
-
Reattach ear tips only when fully dry. Trapped moisture causes internal damage over time and degrades sound quality. Give ear tips at least 15 minutes to air dry after washing.
Pro Tip: Set a weekly phone reminder labeled “earbud clean.” Consistent, light cleaning prevents the kind of hardened buildup that requires aggressive methods and risks permanent damage.
How does earwax buildup actually affect your audio quality?
Earwax buildup does not just look unpleasant. It physically changes what you hear. Buildup can cause a 12–18 decibel drop in key frequency ranges. That is roughly the difference between clear speech and muffled, hard-to-follow audio.
The frequencies most affected sit in the 2–6 kHz range. This band carries consonants, vocal clarity, and the high-end detail that makes music feel alive. When soft wax plugs that range, voices sound muddy and instruments lose definition. You might turn the volume up to compensate, which increases the risk of hearing damage over time.
Physical blockage also forces the drivers to work harder to push sound through the obstruction. This extra load drains battery faster and stresses the driver components. Over months, it shortens the lifespan of earbuds that would otherwise last for years.
Signs your earbuds need cleaning right now:
- Sound is noticeably muffled or lacks treble detail
- Volume feels lower than usual even at maximum settings
- Bass sounds uneven or absent on one side
- Ear tips feel greasy or visibly coated
- Charging is inconsistent or the case does not close properly
- You can see visible debris on the mesh with a flashlight
“Audio degradation results more from buildup layers blocking sound than from any hardware failure. Regular, gentle cleaning restores performance better than any single deep-clean session.”
Catching these signs early means a two-minute brush session fixes the problem. Ignoring them for weeks means hardened wax that requires more effort and carries more risk.
What cleaning mistakes damage earbuds and how do you fix persistent sound issues?
Most earbud damage from cleaning is self-inflicted. The instinct to scrub harder when sound quality drops is exactly the wrong response. Aggressive scrubbing and excessive moisture damage delicate mesh and cause internal electronics failures that no amount of cleaning can reverse.
The most common cleaning mistakes, ranked by damage potential:
-
Using cotton swabs on speaker mesh. Cotton swabs push debris deeper into the mesh and leave cotton fibers that are nearly impossible to remove. This is the single most common cause of permanently blocked earbuds.
-
Soaking earbuds in water or cleaning solution. Even water-resistant earbuds are not waterproof. Soaking forces liquid past seals and into the driver housing.
-
Spraying liquid directly onto the earbud. Spray mist travels further than you expect and enters mesh openings instantly. Always apply liquid to a cloth first.
-
Using sharp objects to pick out wax. Pins, toothpicks, and fingernails tear mesh and scratch driver surfaces. The mesh on most earbuds costs more to repair than the cleaning problem it was meant to solve.
-
Skipping the drying step. Reattaching wet ear tips or placing damp earbuds in a closed case traps moisture against electronics.
Troubleshooting checklist if audio problems persist after cleaning:
- Inspect the mesh under a bright light or flashlight for remaining debris
- Check whether the ear tip is seated correctly on the nozzle
- Try a different ear tip size to rule out fit issues affecting sound isolation
- Test the earbud without the ear tip to isolate whether the problem is in the tip or the driver
- If one earbud sounds different from the other after cleaning, repeat the brushing step with the mesh facing down
- Contact the manufacturer’s support team if sound issues remain after two full cleaning sessions
Pro Tip: If you use your earbuds during workouts, wipe them down immediately after each session before sweat dries. Dried sweat is harder to remove than fresh sweat and is more corrosive to metal contacts.
Key takeaways
Cleaning earbuds with the right tools and technique is the most effective way to preserve audio quality, extend device lifespan, and protect your hearing.
| Point | Details |
|---|---|
| Use the right tools | A soft brush, microfiber cloth, and 70% isopropyl alcohol cover every cleaning need safely. |
| Orient mesh downward | Holding the speaker mesh facing down while brushing lets gravity remove debris instead of redepositing it. |
| Clean ear tips separately | Remove silicone or foam tips and wash with mild soap and water, drying fully before reattaching. |
| Avoid cotton swabs on mesh | Cotton swabs push wax deeper and leave fibers; use adhesive putty instead for mesh cleaning. |
| Clean consistently, not aggressively | Frequent light cleaning prevents hard buildup and protects delicate drivers better than infrequent deep cleans. |
The habit that protects your investment
At Mymanu, we have seen firsthand what happens when great earbuds are neglected. The audio quality that impressed you on day one does not disappear because of a hardware flaw. It disappears because a thin layer of wax and dust slowly closes off the path between the driver and your ear canal.
The conventional wisdom is to do a thorough deep clean every few months. We disagree with that approach. Little-and-often cleaning is safer and more effective than infrequent deep-clean sessions. A 90-second wipe-down after each use and a two-minute brush session once a week will keep your earbuds performing at the level you paid for.
We have also noticed that people who skip cleaning tend to compensate by turning up the volume. That habit accelerates hearing fatigue and masks a problem that a brush could fix in under two minutes. The restored clarity after proper cleaning consistently surprises people who assumed their earbuds had simply aged out of good performance.
The uncomfortable truth is that most “worn out” earbuds are just dirty earbuds. Treat maintenance as part of owning quality audio equipment, not as an optional extra.
— Mymanu
Experience audio the way it was designed to sound
Proper maintenance keeps any earbud performing well. But the starting point matters too. Mymanu designs earbuds built for real-world use, with durable materials and thoughtful construction that make regular care straightforward rather than complicated.
The Mymanu Orb is built for travelers and active users who need reliable audio clarity in demanding environments. Its design supports the cleaning practices covered in this guide, with smooth surfaces, removable ear tips, and accessible charging contacts. If you want earbuds that reward proper care with lasting performance, explore the full Mymanu audio range and find the model that fits how you listen.
FAQ
How often should you clean your earbuds?
Wipe down your earbuds after every use and do a full brush-and-cloth clean once a week. Consistent light cleaning prevents the hardened buildup that requires aggressive methods.
Can earwax permanently damage earbuds?
Yes. Hardened earwax can block speaker mesh permanently and force drivers to work harder, shortening their lifespan. Catching buildup early with regular cleaning prevents this outcome.
Is isopropyl alcohol safe to use on earbuds?
Isopropyl alcohol at 70% concentration or less is safe when applied to a cloth first. Never apply it directly to the earbud or mesh, as direct contact introduces excess moisture.
Why does one earbud sound quieter than the other?
Uneven wax buildup on one speaker mesh is the most common cause. Clean both earbuds using the downward-facing brush technique and check whether the ear tips are seated evenly on both sides.
What is the safest tool for cleaning speaker mesh?
A soft-bristled brush used with the mesh facing downward is the safest option. Adhesive putty like Blu-Tack is a strong secondary tool for lifting debris without pushing it deeper into the mesh.


Compartir:
Earbuds and Travel Safety: Your 2026 Guide
Translation earbud uses in classrooms: 2026 guide